

So, you've decided to make your own cat tree. Let me first congratulate you because not only will this be a fun personal project, but it will really be a great way to save some money. You'll also be expressing your love to your furry friend, who, let's face it, probably doesn't know what we mean when we are constantly telling them we love them.
Let's start with a quick bit of background information at first. Cat trees are a climbable structure in your home that work as a place for cats to climb, hide, play, and scratch. If your cat is driving you a little crazy by climbing and scratching on your furniture or curtains, a cat tree could be just what you need! It's in their nature to want to climb and scratch (they really can't help it) and it's also good for their nails and minds. You'd be protecting your more expensive home items, letting your cat express him or herself, and keeping them nice and healthy all at once!
They come in all shapes and sizes, but the standard cat tree usually looks something like the below, which is the basic general structure we'll be focusing on in this blog.
However, the design and shape is up to you and your creative abilities!
1. Deciding on Shape and Design
Making your own cat tree is great because you can design it to fit the space you're in. If you live in a smaller space but still want to give your cat something amazing, don't worry, they don't need to be huge and ornate to be effective. You can also learn how to create a cozy cat space to complement your new tree.
And no! You don't have to spend a fortune.
At the minimum, you'll probably want something tall enough to be fun to climb, and maybe have a spot at the top for them to lay or sit. You can make it as tall and ornate as you want, with multiple levels or a hiding spot. For reference, one of the more elaborate cat trees look something like this:
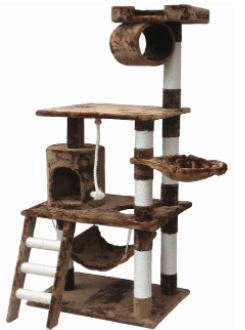
There are countless tutorials on YouTube and other DIY ideas out there that could help you decide what level of complexity (and the amount of creative skill involved) you're comfortable with. If you enjoy this project, you might also want to check out how to make your own kitty enrichment feeders and toys.
2. Gather Your Materials
One of the best materials, from my experience, for cat trees is sisal rope, which is found at most craft stores (think Michaels).
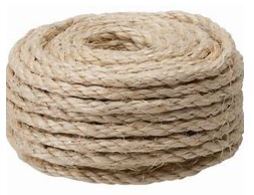
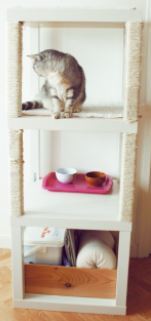
You can use almost any sort of base as a structure if you have sisal rope! I've seen a DIY that uses small IKEA tables stacked on top of one another, with each leg wrapped in sisal rope just to give you an idea of how useful sisal rope is and how creative you can get with different materials that you may just have laying around the house.
FYI
But for the sake of this DIY, we're going to be going for a simple structure like the first picture in this blog.
You'll want to get some sisal rope, a circular saw, particle board, PVC pipe and pipe end caps (found at any home improvement store, such as Lowes), small pieces of fabric or carpet, and a hot glue gun. The reason I suggest using PVC pipes is because they are long, thin, and sturdy. Feel free to use any other item you have laying around your home (like the IKEA tables!) but just keep in mind that you'll want whatever the main structure is made out of to be strong enough for a cat to be climbing and crawling and scratching all over it.
Note Pricing: Sisal rope goes for about 9 dollars per 50 feet, and I would suggest between 200 feet and 300 feet, depending on how tall you want your structure, so this will easily be the most expensive part of your project, so that is something to keep in mind. The PVC pipes are about 9 dollars, and you can get a large piece of particle board for around $17, you can also use plywood but keep in mind it is usually more expensive.
3. Get Started on the Base Using the Particle Board
Cut the particle board into small enough pieces to be a base and for the top of the structure for your cat to lay or sit on. What shape you choose is up to you, so I would recommend either a square or large circle. Circular saws are effective at cutting smaller pieces of particle board, but remember to use caution because this step can be dangerous.
4. Adding the PVC Pipes As the Structure
Once you have your pieces of particle board, choose one piece as the base. This will be what you'll glue your pipes onto. You can keep it really simple, like the first picture above, and keep your pipes straight, but if you want, you can get more creative with the shape. For example, this DIY suggests bending your PVC pipe for a more crooked look:
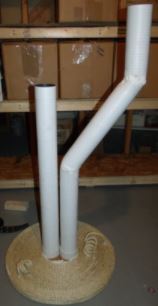
But there's no shame in keeping it simple!
The PVC end caps will serve as a "key" for the pipes, so those will need to be hot glued down face up to the piece of plywood that you're using as your base so you can slide the pipe in it to securely attach.
Once you're happy with how the base looks, attach the tubes securely into their caps using some hot glue to keep them steady and help prevent them from coming loose if your kitty has a powerful enough jump to knock it over.
5. Wrap the Sisal Rope up the PVC Pipe
Then you'll want to cover the tubes with the sisal rope as well because this will make for an amazing scratching post for your cat's nails. Wrap the rope up starting from the bottom around the tubes, hot gluing as you go to help it all stay in place.
Pro Tip: You want the wrapping to be very tight so that you don't see any tube under the rope. Coil it and put it as close together as possible. This will look better (some would even say store bought) and is generally considered gentler on your cat's claws (you don't want them to end up scratching parts of the tube). Leave about 2 inches of tube at the top without rope, because this will need to be put into the end caps at the top to attach to your seating area pieces of particle board.
6. Make the Top (Sitting Area for Your Cat)
Once you're satisfied with your roping job it's time to refocus your attention on the top pieces of particle board that will act as seating areas for your cat.
You'll want to cover these pieces in some swatches of carpet or fabric. You can make them fun colors! Hot glue the fabric or carpet swatches down on top to give your cat a comfortable place to lay and keep the tree from looking sloppy.
7. Attaching the Top Piece to the Rest of the Structure
Attach the end caps to the plywood with hot glue with the open side facing down this time (they will connect with the tubes from the bottom), and slide your tubes in, once again hot gluing them into the caps to keep them secure. Another tip with the hot glue, don't use too much that it is oozing out and around in places it shouldn't be seen. You don't want dried globs all over your cat tree!
8. Enjoy!
Let everything dry and step back to admire your handiwork! Enjoy watching your cat discover it and begin using it.
Your cat will thank you for it later.
Ready to give your kitty the ultimate climbing experience? Find a cat sitter on Meowtel today to watch your feline friend while you're busy crafting!


